

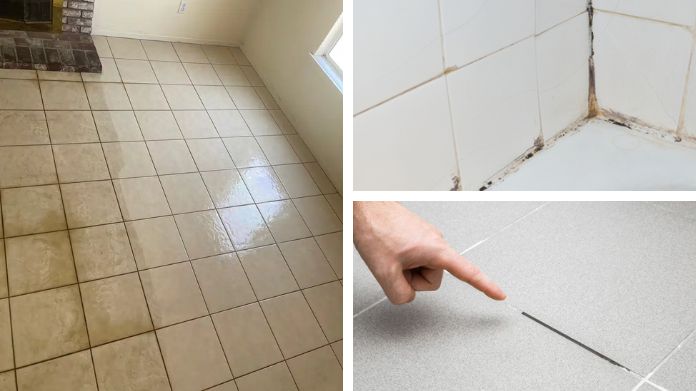
If there are any dirty lines, crumbling edges, or even patches of mold on your bathroom or kitchen tiles, it is not the first time, and many people share your grief.
With time, the grout joining together your tiles or moisture sealing reasons for them gets worn down, stained, and damaged.
This doesn’t just weigh down on beauty but can also lead to some terrible damages like water damage or even loosening tiles.
Enter the grout removal tool. This little bad boy is your first line of defense, whether you’re just patching a spot or going full HGTV-reno on your shower.
Get the right tool, and suddenly you’re saving cash, protecting your tiles, and, bonus, your kitchen actually looks clean.
Table of Contents
Why You Might Need to Remove Grout in the First Place?
 Most of us do not remove grout at all since it is something we do not do all the time. This is when it becomes important:
- Mold or mildew buildup that keeps coming back, no matter how much you scrub.
- Cracks or missing sections of grout make your tiles vulnerable to water damage.
- Stained or discolored grout that just won’t come clean.
- Planning to regrout or retile for a fresh new look.
Whether you are just restoring your kitchen backsplash or going all out with a total bathroom remodel, it begins with cleaning old grout-free lines.
What Exactly is a Grout Removal Tool?
A grout removal tool is specifically designed to dig out the old grout between your tiles without harming them.
Sounds simple enough, but there are quite a few options out there, depending on your project size, tile type, and experience level.
Manual Tools
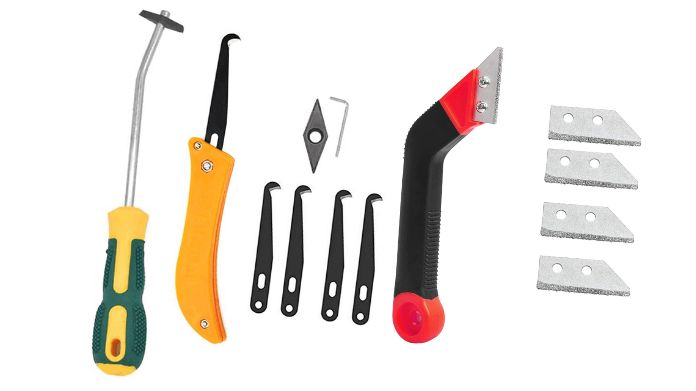 Perfect for smaller jobs and delicate tiles. These include:
- Carbide grout saws – Great for precision.
- Grout removal knives – Ideal for tight spaces and control.
Power Tools

Better for larger areas or if you’re short on time:
- Oscillating multi-tools – Versatile and effective.
- Rotary tools (like a Dremel) – Precise but slightly more advanced.
Choosing the Right Grout Removal Tool for You
Think of it like picking the right brush for a painting project, one size doesn’t fit all.
- Small touch-ups? Go manual. You’ll have more control and less risk of tile damage.
- Big renovation? A powered grout removal tool can cut your work time in half.
- First-time DIYer? Start with tools that offer good grip, clear control, and safety guards.
- Working with delicate or vintage tiles? Stick to hand tools, slower, yes, but much safer.
How to Use a Grout Removal Tool? Step by Step
Whether you’re using a manual tool or something with a little more power, here’s how to do it right:
If You’re Using a Manual Tool:
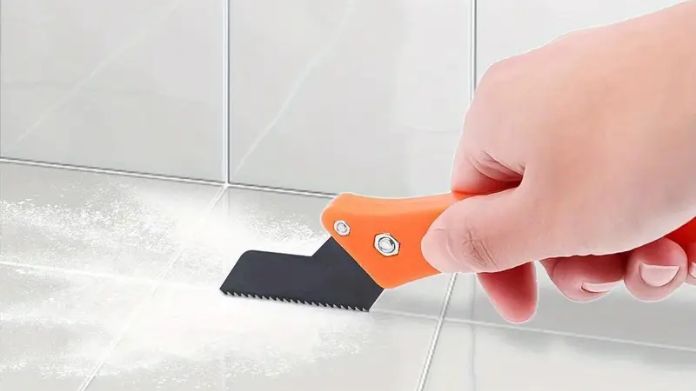
- Mark out the grout lines to be removed.
- Hold at a 45° angle. This means control, and no gouging of tile will occur.
- Scrape slowly with back-and-forth motion. Take no rush at it.
- Vacuum and wipe the joints regularly to keep your work area clean.
If You’re Using a Power Tool:
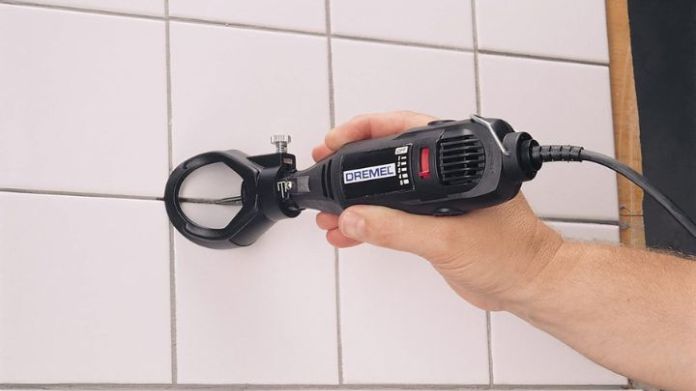
- Attach carbide grease or diamond blade designed for mortar removal.
- Start slow. Allow the blade to find its groove before speeding works.
- Guide the tool along the joints-it should not be forced.
- Watch Pressure Too Much Force and the Tiles Are Risked.
Stay Safe While You Work
Grout removal creates a lot of dust. Here are a few simple ways to protect yourself:
- Always wear safety goggles, gloves, and a dust mask.
- Work in a well-ventilated area.
- Keep kids and pets far from the project zone.
- Avoid using power tools near loose or already cracked tiles.
Common Mistakes That Can Ruin the Job
Even experienced DIYers make mistakes. Avoid these to keep your tiles and your sanity intact:
- Using kitchen knives or screwdrivers instead of proper grout removal tools.
- Removing only a thin layer of grout, you need to get at least ⅔ out for new grout to stick well.
- Cranking up the power tool speed too high and chipping tiles.
- Skipping clean-up and jumping straight into regrouting.
A dusty joint = a weak bond.
What to Do After Removing the Grout?
You’re not done just yet. Here’s how to wrap things up the right way:
- Clean and dry the grout lines thoroughly, with no dust or debris left behind.
- Pick a grout mix that’s compatible with your tiles and room type (sanded, unsanded, waterproof, etc.).
- Use a grout float or applicator to press the new grout firmly into the joints.
- Let it cure properly, ideally 24 hours without water or foot traffic.
Final Thoughts
Removing grout may be one of the most trying jobs imaginable, but the right tool for the task, with a dollop of patience and even proper technique, makes it possible for anyone. Manual tools allow precision; powered tools speed up everything.
So, whether you’re refreshing your kitchen backsplash or giving your shower a full facelift, don’t rush it.
Protect your tiles, follow the steps, and soon enough, you’ll be admiring your refreshed space like a pro.