

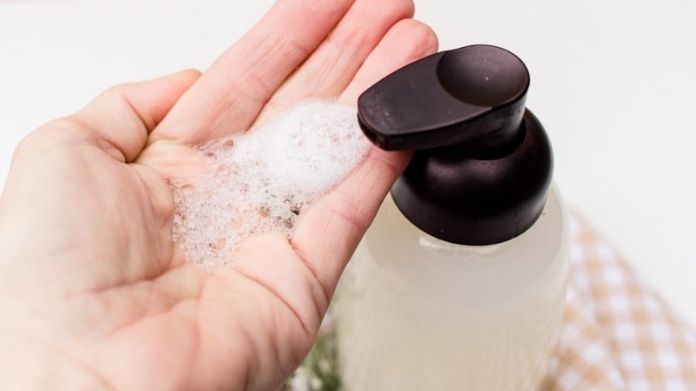
There is something unusual in the feeling of pressing down on a pump and getting that fluffy, bubbly foam instead of plain liquid soap.
It just feels fun, somehow making hand washing easier for kids, besides lasting a bit longer. No wonder foaming hand soap has become a favorite in so many homes, like a homemade conditioner bar.
But here’s the catch store-bought versions often come with a high price tag, unnecessary chemicals, and way too much plastic waste.
That’s why more folks are getting into DIY projects at home. you can whip up a super easy, wallet-friendly foaming hand soap with just a few simple things.
Table of Contents
Why Choose DIY Foaming Hand Soap?
Store-bought foam is handy, but homemade stuff beats it for the daily grindy. A refill you mix at home often costs just a few rupees per bottle compared to $4–$6 for many brands.
Health-wise, you can skip harsh antibacterials and synthetic fragrances. And yes, kids love the foam (let’s be honest, bubbles make better handwashers).
That broad chorus you hear from so many trusted home and wellness voices online is indeed resonated by guides and resources like Wellness Mama
It offers gentler ingredient suggestions; cost-saving tutorials on Instructables; and wonderful, basic, planet-friendly tips that make up the celebrity-style homemaking resources. Take what resonates, leave the rest, and make it fit to your sink and skin.
Essential Ingredients
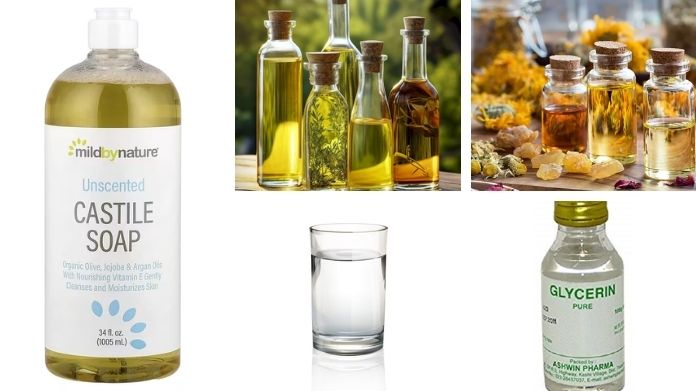
- Liquid Castile Soap (unscented or scented): The cleansing base. It’s concentrated, plant-based, and a little goes a long way.
- Carrier Oil (olive, jojoba, or sweet almond): Adds light moisture so hands don’t feel stripped. Just a tiny bit keeps skin happy.
- Essential Oils (optional):
- Lavender for a calming, spa-like scent.
- Tea tree for a crisp, clean aroma often favored in “fresh” blends.
- Peppermint for cool, tingly freshness.
- Citrus (sweet orange, lemon, grapefruit) for bright, sunny vibes.
- Use sparingly, these are potent.
- Water (distilled or previously boiled and cooled): Dilutes the soap so it can foam properly.
- Glycerin (optional): A small splash gives silkier lather and extra glide.
Sensory tip: Aim for “light and clean,” not perfume-counter heavy. If you notice the scent linger long after drying, you probably used too much EO.
How to Prepare Foaming Soap? Step-by-Step Guide
 You’ll need: a clean foaming soap dispenser (reuse a sturdy one), measuring spoons, and the ingredients above.
- Prep the bottle. Rinse your foaming dispenser with warm water. If it’s new to you, pump warm water through it to clear the mechanism.
- Add the soap. Start with the standard ratio below. For easy measuring, think: 1 part castile soap to 10–12 parts water.
- Add moisture. Mix in ¼–½ tsp carrier oil per ~200–250 ml bottle.
- Scent it (optional). Add 5–10 drops of total essential oils.
- Top with water. Fill with distilled or cooled boiled water, leaving 2–3 cm of headspace so the pump can do its foaming magic.
- Combine gently. Cap and swirl (don’t shake hard) to avoid extra bubbles.
- Test & tweak.
- Want more lather? Add a little more castile soap.
- Want more slip? Add a drop or two more carrier oil or ¼ tsp glycerin.
Quick example (≈200 ml bottle):
- 1 tbsp castile soap
- ¼–½ tsp carrier oil
- 5–8 drops essential oil (optional)
- Fill the rest with water, leaving headspace
Tips for the Best Results
- Proportions that behave: Start at 1:12 (soap:water). Move toward 1:10 only if you want a fuller lather.
- Seasonal scent ideas:
- Calming Night: lavender + a tiny hint of vanilla.
- Fresh Morning: lemon + peppermint (very few drops of peppermint).
- Cozy Kitchen: sweet orange + cinnamon leaf (use sparingly).
- Shelf life: No preservatives = small batches. Mix what you’ll use in 1–2 weeks.
- Clogged pump? Rinse the pump with warm water and use less oil/glycerin next time.
- Separation is normal: Oil and water may part ways. Just swirl before use.
- Sensitive skin? Keep it unscented or go ultra-light on essential oils. Patch test first.
- Kid & pet safety: Some essential oils (like strong mints or eucalyptus) aren’t ideal for little kids. When in doubt, skip or keep it minimal.
Sustainable & Creative Uses
- Repurpose dispensers: Glass foaming bottles look chic; sturdy plastic is great for slippery bathrooms. (Old syrup or sauce bottles with foam tops? Surprisingly classy.)
- Two-in-one hack: Your foaming hand soap doubles as a light body wash or gentle shaving foam in a pinch.
- Batch smart: Store extra unscented base in a labeled glass jar; scent each small refill fresh to keep it bright.
- Refill routine: Make refilling part of your weekly tidy-up, tiny habit, big waste reduction.
Wrap Up!
Making your own foaming hand soap is easy, inexpensive, and slightly addicting in the best way. The ingredients are clean and natural, pennies per refill, and less plastic waste in the bin. You can funk it with scents that resonate with your mood, season, or bathroom shelf.
Ready to try it? Mix your first small batch, play with a gentle scent, and see how it feels at your sink. Ditch store-bought and make your own foaming hand soap today for fresh, healthy results!