

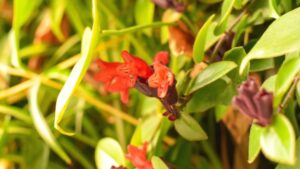
Are you ready to add a pop of color and tropical flair to your home with a lipstick plant? How do you ensure that your glossy-leaved beauty thrives and blooms? Look no further!
This guide is your roadmap to growing and caring for a lipstick plant, even if you’re a beginner.
We’ll guide you through selecting the right soil, mastering the watering routine, and all the care tips.
Dive in, and let’s start the journey toward nurturing your lipstick plant into a vibrant, flourishing spectacle.
Table of Contents
Understanding Your Lipstick Plant’s Needs
Caring for this plant means understanding its unique requirements. This tropical beauty thrives under specific conditions, and with the right approach, you can enjoy its lush foliage and striking blooms year-round.
1. Soil and Nutrients
 The foundation of a healthy lipstick plant lies in its soil.
Opt for a well-draining mix, rich in organic matter like healthy compost, to keep your plant’s roots happy.
A blend of peat, pine bark, and perlite will ensure proper drainage and aeration. Regarding nutrients, your plant is a moderate feeder, but it does appreciate a boost during its growing season.
Use a balanced, water-soluble fertilizer every other week in spring and summer to encourage vibrant growth and flowering.
2. Watering
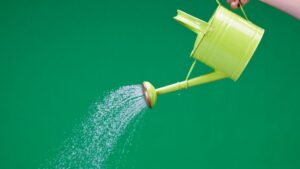
Watering your plant correctly is crucial. It prefers a drink when the top inch of soil dries, but be wary of overwatering.
Overwatering may cause root rot, a frequent issue among indoor plant enthusiasts.
To determine the need for water, push your finger into the soil up to an inch. Should the soil at this level be dry, then it’s time to quench your plant’s thirst. If not, give it a few more days.
Consistency is key—your lipstick plant will thank you for a regular watering schedule that mimics the natural rainfall of its native jungle.
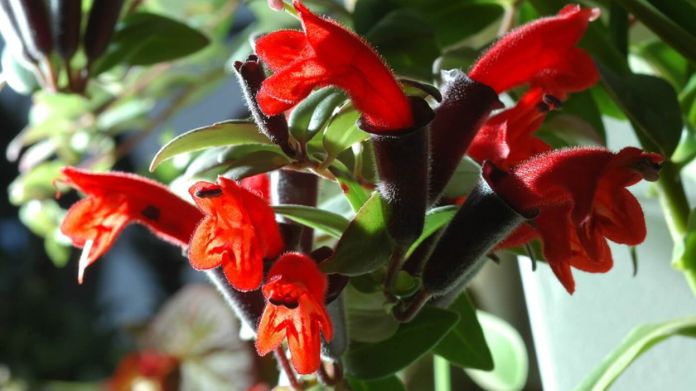
3. Light Requirements
 Lighting is like the plant’s best friend—it needs just the right amount to shine truly.
Bright, indirect light will coax out those lovely blooms, so place it near a window where the sun’s rays aren’t direct but still plentiful.
If you notice less flowering or leggy growth, it might be a sign to adjust your plant’s position to somewhere with better light.
4. Temperature and Humidity
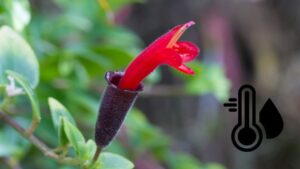
Your lipstick plant is a child of the tropics and loves warmth and humidity.
Keep the temperature between 65°F and 80°F, and avoid sudden drops which can shock the plant.
Humidity is just as important; if your home is drier, consider a humidifier or a pebble tray to up the moisture in the air. Remember, a happy lipstick plant is warm and moist, just like its tropical home.
Step-by-Step Guide to Planting and Propagation
Propagating a lipstick plant is a rewarding experience that allows you to multiply your collection or share it with friends.
Follow these steps to ensure the successful planting and propagation of your plant.
Step 1: Choose Your Cutting
Select a healthy stem from an established lipstick plant. Look for a segment around 4 to 6 inches long with several leaves. Make your cut just below a leaf node, where the roots will sprout.
Step 2: Prepare for Rooting
To expose the nodes, remove the leaves from the bottom part of the cutting. These bare nodes are where your new roots will emerge.
For an extra boost, dip the cut end into rooting hormone powder, which encourages root growth and protects against disease.
Step 3: Plant Your Cutting
Place your cutting into a small container filled with a potting mixture that drains well, such as a blend of peat, perlite, and vermiculite.
Insert the stem into the mix, making sure to submerge at least two nodes beneath the surface, as these will be the starting point for your lipstick plant’s roots.
Step 4: Create a Humid Environment
To replicate the humid conditions the plant adores, cover the pot with a clear plastic bag or place it in a mini greenhouse.
This will keep the humidity high and the soil moist, providing the perfect environment for roots to develop.
Step 5: Place in Proper Light
Set your newly potted plant cutting in bright, indirect light. Avoid direct sunlight, which can be too intense and cause the cutting to wilt.
Step 6: Water Carefully
Water the cutting sparingly to keep the soil moist but not soggy. Overwatering can lead to rot, which would be detrimental to your propagation efforts.
Step 7: Wait for Growth
Patience is key. In a few weeks, your plant cutting should show signs of growth. Gently tug on the plant after about a month; if there’s resistance, roots have formed.
Step 8: Transplant if Necessary
After your lipstick plant has developed a strong network of roots, it’s time to move it into a bigger pot.
Continue to care for it as you would a mature lipstick plant, and soon, you’ll have a new, flourishing addition to your plant collection.
Tips for Successful Rooting and Growth
 To ensure your lipstick plant cuttings take root and flourish, here are some tried-and-true tips:
1. Use Fresh, Sterile Potting Mix
Starting with a clean slate is vital. Use a fresh, sterile potting mix to prevent disease from compromising your plant’s growth. This will give your cuttings the best chance at a healthy start.
2. Ensure Adequate Humidity
Lipstick plants love humidity. Create a mini greenhouse by covering your cuttings with a clear plastic bag or placing them in a propagator. This traps moisture and warmth, speeding up the rooting process.
3. Keep the Soil Moist, Not Wet
While your lipstick plant cuttings need moist soil, too much water can be detrimental. Ensure the soil is damp but not waterlogged to prevent rot.
4. Provide Bright, Indirect Light
Position your cuttings where they’ll receive plenty of bright, indirect light. Direct sunlight can be too harsh, but with sufficient light, your lipstick plant may grow.
5. Maintain Optimal Temperature
Warmth is a friend of the lipstick plant. Keep the environment around your cuttings at a steady 70°F to 75°F for optimal growth.
6. Be Patient
Rooting takes time. Resist the urge to tug on your lipstick plant cuttings to check for roots. Give them a few weeks to establish themselves.
7. Transition Gradually
Once your cuttings have rooted, acclimate them to less humid conditions gradually. This will prevent shock and allow your lipstick plant to adjust to its new environment.
8. Fertilize with Care
When your lipstick plant shows signs of new growth, start a light fertilization regimen. A half-strength liquid fertilizer every month during the growing season can encourage lush growth.
9. Prune for Fullness
As your lipstick plant grows, prune it to encourage a bushier appearance. This will lead to a more aesthetically pleasing plant and promote vigorous growth.
Routine Care and Maintenance
Keeping your lipstick plant in top shape involves a few regular practices to ensure it remains healthy and vibrant.
- Water Wisely: Your lipstick plant likes its soil to dry out slightly between waterings. Check the topsoil weekly; if it’s dry, it’s time to water. Always allow excess water to drain to prevent root rot.
- Light and Location: Place your lipstick plant in a spot with bright, indirect sunlight. Rotate the plant occasionally to ensure even growth on all sides.
- Temperature Control: Keep your home within the lipstick plant’s comfort zone of 65°F to 80°F. Avoid placing it near drafty windows or vents.
- Humidity Happiness: As a tropical plant, it loves moisture in the air. Should the air in your home be drier, consider employing a humidifier or setting your plant atop a tray of pebbles and water to boost the surrounding humidity.
- Feeding Finesse: During the growing season, spring to fall, feed your lipstick plant every two weeks with a half-strength liquid fertilizer. In winter, reduce feeding to once a month.
- Pruning and Grooming: Trim back leggy stems to encourage a fuller, bushier plant. Remove any yellow or dead leaves to keep your plant looking tidy and to encourage new growth.
- Pest Patrol: Keep an eye out for common pests like aphids and spider mites. If you spot pests, treat your lipstick plant with a gentle insecticidal soap.
- Repotting: Every couple of years, or when the roots become crowded, repot your lipstick plant in a slightly larger container with fresh soil to give it room to grow.
By following these care guidelines, your lipstick plant will continue flourishing, bringing a splash of color and tropical flair to your indoor garden.
Final Words
Providing the proper care for your lipstick plant is straightforward and rewarding. With consistent watering, ample indirect light, adequate humidity, and regular maintenance, your lipstick plant will thrive.
Embrace these simple steps, and you’ll enjoy the lush, vibrant beauty of this tropical gem in your home.