

Are you thinking about changing up your home by remove load bearing wall? It’s a big task, but it can really open up your space and add value to your home.
In this guide, Okayreview will walk you through each step of the process. From figuring out which wall is load bearing to putting in a support beam and finishing up, we’ve got you covered.
Follow along for a clear, step-by-step approach to safely remove load bearing wall and transform your living area.
Table of Contents
Steps to Remove Load Bearing Wall
Taking down a load bearing wall does more than open up space. It improves how your home looks and works.
You need to do a few important things:
- Find out which wall is load bearing.
- Put in a support beam.
- Do the final touches.
This makes sure everything looks and functions great after you remove the wall.
1. Identifying a Load Bearing Wall
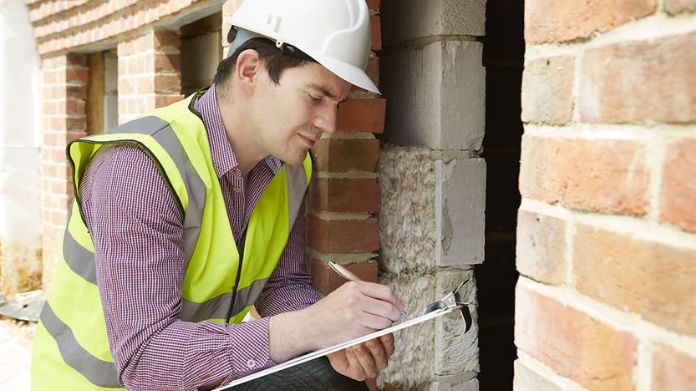 Before you plan to remove load bearing wall, it’s key to know if the wall is really load bearing.
Here’s how to spot one:
- Check the Direction of Joists: Go to your basement or attic. Look at the floor joists. If the wall is below or above these joists and runs at a right angle to them, it’s probably load bearing.
- Look at Blueprints: If you have your house’s blueprints, they can show you which walls are load bearing.
- Notice Wall Position: Load bearing walls often run through the center of the house. They usually carry weight from the roof or upper floors to the foundation.
- Consult a Pro: If you still need to figure it out, it’s best to ask a structural engineer or a skilled contractor. They know how to tell for sure.
2. Preparation for Removing a Load Bearing Wall
 Getting ready to remove a load bearing wall? Here’s what you need to do:
- Get Permits: First, check with your local building office. You’ll likely need a permit to remove load bearing wall.
- Plan for Utilities: Look for any electrical wires, pipes, or ducts in the wall. You should move these.
- Talk to an Expert: It’s smart to get advice from a structural engineer. They can tell you how to remove the wall safely and what support you’ll need afterward.
- Gather Your Tools: Ensure you have all the necessary tools and safety gear.
- Set Up Temporary Supports: You must put up temporary supports before removing the wall. This keeps your house safe and stable.
3. Building Temporary Support
 When you’re set to remove load bearing wall, building temporary support is a must.
Here’s how to do it:
- Choose the Right Spot: Place your temporary supports close to the wall you’re removing. But leave enough space to work comfortably.
- Use Strong Materials: Make your supports from sturdy materials. Typically, 2×4 or 2×6 lumber works well.
- Build Two Supports: You’ll need one support on each side of the wall. This helps to hold up the weight from above evenly.
- Secure Top and Bottom: Attach a horizontal beam to the ceiling and a similar one to the floor. These are your top and bottom plates.
- Add Vertical Studs: Place vertical studs between the top and bottom plates. Make sure they’re snug and straight.
- Check Stability: Once your supports are up, check them well. They should be firm and not wobble.
4. Demolishing the Load Bearing Wall
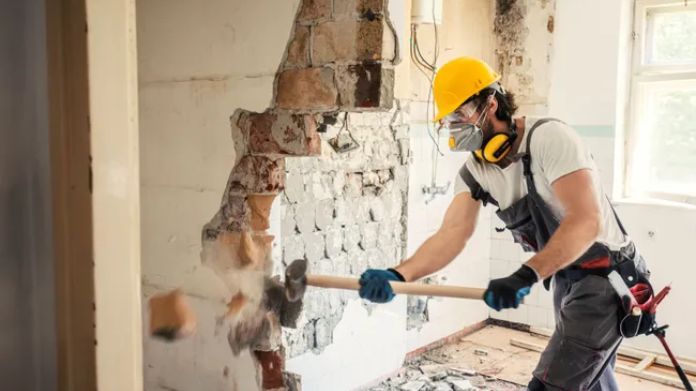 When you’re ready to remove load bearing wall, it’s crucial to approach the task with caution and precision.
Here’s a detailed breakdown of the steps:
- Prioritize Safety: Before you begin, gear up for safety. This means wearing protective goggles to shield your eyes from dust and debris, sturdy gloves to protect your hands, and a dust mask to avoid inhaling particles. Safety should always be your top priority when you’re about to remove a load bearing wall.
- Shut Off Electricity: To prevent any electrical hazards, ensure that the power supply to the area is turned off. This is especially important if there are electrical outlets or wiring within the wall. Accidentally, cutting into live wires can be dangerous.
- Remove the Drywall: Start the demolition process by removing the drywall. You can use a hammer to create an initial hole and then a pry bar to pull the drywall away from the studs gently. Be methodical and careful to avoid damaging hidden utilities like wiring or pipes.
- Extract the Studs: Once the drywall is off, you’ll see the studs that make up the frame of the wall. These need to be removed next. Depending on how they are attached, you can either use a reciprocating saw to cut them at the top and bottom before prying them out or a sledgehammer for a more direct approach. However, be cautious with your force to maintain the integrity of the surrounding structure.
- Proceed Slowly and Carefully: Taking your time with this process is essential. Rushing through the demolition can lead to mistakes or even structural damage. Be mindful of the temporary supports you’ve set up and ensure they remain stable throughout the process.
- Keep the Work Area Clean: As you remove pieces of the wall, regularly clear away the debris. This not only keeps your workspace safe but also allows you to work more efficiently. A clean area reduces the risk of tripping over or stepping on sharp objects.
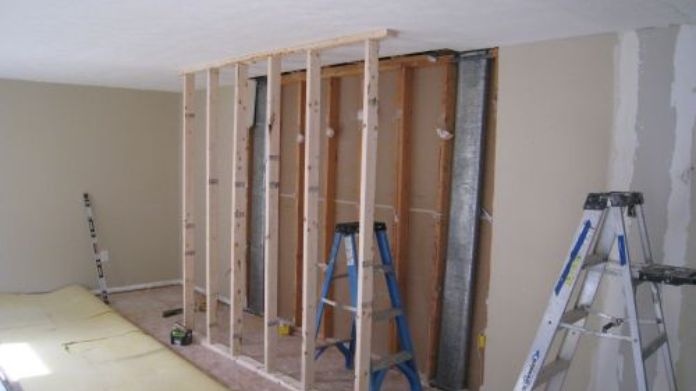
5. Installing a Support Beam
 After you remove load bearing wall, putting in a support beam is crucial. Here’s how to do it:
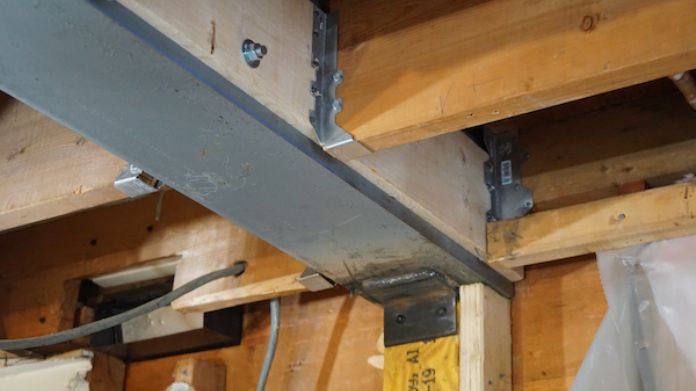
- Choose the Right Beam: Pick a strong beam to hold the weight. Steel or laminated veneer lumber (LVL) beams are good choices.
- Place King Studs: Install king studs at both ends of the wall. These studs will hold your beam.
- Prepare for the Beam: Make sure the area where the beam will go is clear and ready.
- Lift the Beam: With help, lift the beam into place. This can be heavy, so be careful.
- Secure the Beam: Attach firmly to the king studs once the beam is up. Use strong nails or screws.
- Check Alignment: Make sure the beam is level and straight. This is important for safety and stability.
6. Finishing Touches After Removing the Wall
 Once you remove load bearing wall and install the support beam, it’s time for the finishing touches. Start by cleaning up all the debris and dust.
This makes your space neat and ready for the next steps. Next, patch any holes or gaps in the ceiling and walls where the wall was.
You might need new drywall for this. After that, paint the patched areas to match the rest of your room. If the flooring was affected, repair or replace it to blend seamlessly with the rest of the floor.
These final steps are important to give your space a polished and complete look after you remove a load bearing wall. They help transform your newly opened area into a cohesive part of your home.
Final Words
Taking out a load bearing wall is tough but worth it. It really opens up your home, making it feel bigger and adding value.
Just follow these steps and get help from pros if you need it. This way, you can safely remove load bearing wall and enjoy a more spacious home.